In this age of ipads, tablets, and even chromebooks we don’t seem to have as much trouble with failing hard drives. rouble is it does still happen on desktop computers and I ran into this yesterday. However if your tablet needs some fixing so you can complete this, get some help with this tablet repair service.
My son has a desktop computer with a fairly small 160 gig hard drive and over the last few weeks it has been locking up, running on startup and performing inconsistently.
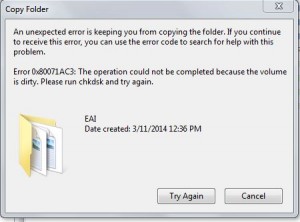
When I went to the system management (right click my computer and hit manage) in the event logs I could see that there were a few disk errors and so I knew that I would have to replace the drive. If you are in the same boat, I would recommend you to contact data center recycling services to securely dispose of your old hard drive.
I got an identical hard drive and this caused me a bit of a problem as you will see below.
My Tough Disk Clone Situation
If I am at work I have lots of resources but since this is a home project I had my hands tied a bit. I have computers, one bad drive, one good drive, no big network share to work with so I had to find a way to transfer 100 gigs of data from a failing drive to a known good drive.
First I looked for some kind of cloning software, I used to use Drive Image as well a Ghost but I ran across an even better option for myself.
I do not want the old drive data, I have nowhere to copy the data to, and I just wanted to have a bootable image again.
The How to Geek had a great article on using Ubuntu live CD to clone the drive to a new drive.
I have to admit I use Windows lots, Windows server, Windows desktops, all versions, but no Linux at all.
First of all I went to the Ubuntu site and downloaded a copy of the software, this was an ISO file and I was able to use CD Burner XP (free) to burn this ISO image to the disk, Then at would I was able to borrow a drive caddy, all this is for us is a hard drive container that would connect the failing hard drive to USB on my computer.
I was now all ready to go. I put the replacement drive in the computer and this would stay there. Then I plugged in the drive caddy with the failing drive and was able to boot up the Ubuntu DVD instead of a hard drive and since I was using neither of the drives as an active operating system I got it booted up and saw both drives.
Now the tough part, since both drives were the same (even if one was labeled as USB in Ubuntu) I didn’t want to screw up and copy the useless crap from the new drive to the failing drive. I needed to know which drive was bad and which drive was good and was very nervous I would screw it up.
Simplicity of Linux for Us
I needed to go to the programs section of Ubuntu and download and install gparted.
Gparted is not part of the operating system but by just clicking the Gparted program icon it installed it and put it on the sidebar so I could access it.
After the 3 minutes or so that the Gparted install too I was able to delete the partitions on the new drive and it also told me the name of /dev/sdb which was the bad drive and /dev/sda which was the good drive and I was able to follow the How To Geek’s instructions to get the data copied from one drive to the other.
After 11,700 seconds (overnight for us) we rebooted to Windows on the new good drive and so far all is good. I want to thank the How to Geek and his great instructions but even as a lifelong techy this was a bit of a challenging situation but a great learning experience for me.